
Gmail Connector Integration Guide

Introduction
The Gmail Connector enables seamless integration with the Gmail platform, empowering users to automate email sending, reading, and data ingestion tasks. This guide provides comprehensive instructions on configuring and utilizing the Gmail Connector within your application.
Getting Started with Gmail
To begin using the Gmail connector, follow these steps:
- Create a Google Account: Visit the Google website and sign up for an account (https://accounts.google.com/).
- Set Up Your Google Account: Once registered, familiarize yourself with Gmail features like sending/reading emails and managing labels.
- Generate API Credentials: In your Google Cloud Console, create a project and generate OAuth 2.0 credentials. These tokens are required for authentication when interacting with the Gmail API.
Configuring the Gmail Connector
Once you have your Google Account and API credentials, configure the Gmail Connector with the following settings:
- token: Your OAuth 2.0 access token.
- refresh_token: Your OAuth 2.0 refresh token.
- expiry: The expiry time of the access token.
Configuration Example
YAML
gmail_connector:
  token: "your_access_token"
  refresh_token: "your_refresh_token"
  expiry: "your_token_expiry_time"
Obtaining Google API Credentials
- Go to the Google Cloud Console (https://console.cloud.google.com/).
- Create a new project or select an existing one.
- Navigate to the "APIs & Services" section and select "Credentials".
- Create OAuth 2.0 credentials and choose "Web application" as the application type.
- Note down the access token and refresh token.
- Configure the appropriate redirect URIs for your application (refer to your application's documentation).
Setting Up Your Application
- Insert the obtained credentials (
token,refresh_token, andexpiry) into your application's configuration file or environment variables.
Securing Your Gmail Integration
Here are some measures to enhance security:
- Enable Two-Factor Authentication (2FA): Require an additional verification step when accessing Gmail accounts.
- Use OAuth 2.0 Flow: Securely obtain and manage tokens instead of storing them directly in your application.
- Encrypt Sensitive Data: Encrypt access and refresh tokens for added protection.
- Validate User Input: Sanitize user input (email addresses, message IDs) to prevent security vulnerabilities.
- Implement Rate Limiting: Enforce limits on API requests to prevent abuse or unauthorized access.
- Follow Secure Coding Practices: Regularly update your application and dependencies to address security vulnerabilities.
Features of the Gmail Connector
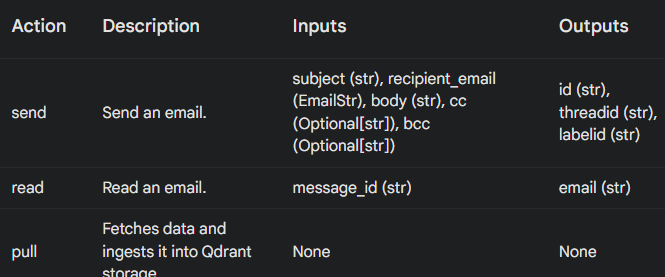
- Sending Emails: Define subject, recipient, body, and optional CC/BCC fields.
- Reading Emails: Retrieve emails using a specific message ID for programmatic access to email content.
- Pulling Data: Fetch data about the configuration and ingest it into Qdrant storage for extracting relevant information from Gmail.
Actions
The table below details available actions within the Gmail Connector:
Best Practices
- Email Management: Organize and manage emails efficiently for a smooth workflow.
- Error Handling: Implement robust error handling mechanisms for email sending, reading, or API interactions.
- Security: Securely manage and protect your OAuth 2.0 tokens to prevent unauthorized access.
Conclusion
The Gmail Connector provides a powerful solution for automating email-related tasks through seamless Gmail platform integration. By leveraging Gmail's capabilities, developers can build sophisticated automation workflows for streamlined email management and improved productivity. With proper configuration and best practices, users can harness the full potential of Gmail to manage emails effectively and automate repetitive tasks efficiently.